Monday, July 7, 2014

Pooh & Friends Paper Bag Puppets By Miranda Becker

Pooh and his pals from the Hundred Acre Wood find fun wherever they go. Craft your very own Pooh, Piglet, and Tigger puppets from colorful paper bags and cardstock. Put on a puppet show and create your own adventures for this silly old bear.
You'll need:
  • Character templates
  • 3 paper bags (red, orange, pink)
  • Cardstock (golden yellow, dark pink, light pink, black, orange, cream)
  • Scissors
  • Glue stick
  • Black marker
Instructions:
1. Print the templates and cut out the pieces.
For Tigger:
2. Trace Tigger's template pieces onto the color cardstock specified. Cut out the pieces.
3. Lay an orange paper bag on a flat surface with the bottom flap facing up. Glue the jaw just under the flap.
4. Glue Tigger's head to the bottom flap.
5. Now glue the cream-colored snout and eye-patch onto Tigger's head. Glue the pink nose in the center of Tigger's face, overlapping the snout and eye-patch.
6. Glue Tigger's mouth and tongue to his jaw.
7. Add details like eyes and stripes. Finally, glue on Tigger's expressive eyebrows.
For Pooh:
8. Trace Pooh's template pieces onto the color cardstock specified. Cut out the pieces.
9. Lay a red paper bag on a flat surface with the bottom flap facing up. Lift the bottom flap and glue the jaw just underneath.
10. Glue Pooh's head onto the bottom flap.
11. Glue on details like Pooh's dark red mouth, pink tongue, and black nose.
12. Add details like eyes and a mouth with a black marker.
For Piglet:
13. Trace Piglet's template pieces onto the color cardstock specified. Cut out the pieces.
14. Glue the ears to the top of Piglet's head.
16. Lay a pink paper bag on a flat surface with the bottom flap facing up. Lift the bottom flap and glue the jaw just underneath.
17. Glue Piglet's head, with ears attached, onto the bottom flap.
18. Glue on Piglet's pink snout and add details like eyes and eyebrows using a black marker.

http://family.go.com/crafts
For more fun activities follow me at
https://facebook.com/childrens.exclusives

Wednesday, July 2, 2014

DIY Take Along Game of Tic Tac Toe by MollyMooCrafts


Entertain the kids with this DIY Take along game of tic tac toe!  It is a fun kids activity  that will keep kids happy even on long road trips. 


Here is what you need to make your very own take along game of Emotional Tic Tac Toe:
  • 8 Wine Corks
  • Acrylic Paint
  • Pencil
  • Black Sharpie
  • Felt
  • Sewing thread
Start by painting the corks white to cover the graphics and leave aside to dry.
Then with a pencil lightly draw the outline of the face on each cork and use this line as a guide for painting outside with the main colors. You need to paint four corks in one color and the balance in another contrasting color – the opposition!!
When dry the kids will really enjoy adding the character to each cork, which one is happy, grumpy and confused?
Now to play you can simply have a sheet of paper and some pencils to make the tic tac toe grid or if you want something more permanent that the kids can come and go to, again and again and again, just cut a piece of craft felt into a square and sew on some quick grid lines with zig-zag stitching. Easy, even for someone who can only sew in straight lines like myself!!! I’ll get there…. eventually!! More on www.skiptomylou.com
For more fun activities visit
https://www.facebook.com/childrens.exclusives

Saturday, June 28, 2014

Fun Farm Veggies By: Paula Bales for Styrofoam Brand Foam

Make your child want to eat more veggies with these Fun Farm Veggies. If they can laugh and play with these little guys, they might want to try the real thing. This is a project for anyone looking for easy crafts for kids. Use Styrofoam and other easy-to-find craft materials to your own version of this project. Country craft ideas have never looked this tasty. Paint a cute face on your veggies to give them an extra fun look.
Materials:
  • STYROFOAM Brand Foam:
    • Cones, 6" x 3", two
    • Egg, 5", one
    • Ball, 3", one
  • Acrylic paints: orange, purple, red
  • Clay pots, one each: 2-1/2"; 3"
  • Plastic canvas yarn, 2-ply, green
  • Wiggle eyes, four each: 10mm; 15mm
  • Wooden ball knobs, 3/8", four
  • Serrated knife
  • Candle stub or paraffin
  • Fine-line black permanent marker
  • Ruler
  • Paintbrushes: round, flat
  • Disposable palette
  • Water basin
  • Paper towels
  • Scissors
  • Low-temp glue gun and glue sticks
  • Thick, white craft glue

Instructions:
Carrots
  1. Pass knife blade through candle stub. Use knife to cut foam cones into carrot shapes; carrots should be slightly different. Sand carrots with scrap piece of foam. Use paintbrush handle to indent horizontal lines in carrots; use finger to make round indentation in top of each carrot.
     
  2. Paint carrots orange, and two ball knobs red (noses).
     
  3. Glue two 10mm wiggle eyes to one carrot and two 15mm eyes to remaining carrot. Paint top third of each eye orange for eyelids; use marker to outline eyelids.
     
  4. Using photo as guide, glue noses to carrots. Using very little paint, paint cheeks red. Use marker to draw mouths and eyebrows.
     
  5. For carrot stems, glue yarn loops of various sizes together; glue stems to carrot tops.
     
  6. Glue additional yarn loops inside top of 2-1/2" clay pot. Glue carrots together, then glue carrots inside pot.
Eggplant
  1. Follow carrot instructions, except:
     
  2. Cut foam egg into eggplant shape; indent top.
     
  3. Paint eggplant purple, and one ball knob red (nose).
     
  4. Glue two 15mm eyes to eggplant. Paint eyelids purple; outline.
     
  5. For leaves, glue small yarn loops to top of eggplant. For stem, cut three 3/4" lengths from yarn. Glue lengths together, then glue to top of eggplant.
     
  6. Glue additional yarn loops, and eggplant, inside top of 3" pot.
Tomato
  1. Follow carrot instructions, except:
     
  2. Cut foam ball into tomato shape; indent top.
     
  3. Paint tomato red, and one ball knob orange (nose).
     
  4. Glue two 10mm eyes to tomato. Paint eyelids red; outline.
     
  5. Follow eggplant Step 4.


Read more at http://www.favecrafts.com   

Monday, June 16, 2014

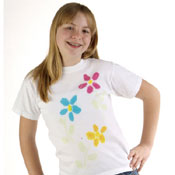
Tie -Dye T-shirt

Use tie-dye to create this colorful flower T-shirt with simple painting. This tie-dye painting project from I Love to Create is a fun activity to do with kids. 
Flower Tie-Dye Shirt
Materials:
  • Tulip® One-Step Tie-Dye Kits™
  • Garbage bag
  • Foam plate
  • Paper towels
  • Cardboard
  • T-shirt, white
  • Masking tape
  • Plastic wrap
  • 1” flat paintbrush
  • Scratch paper
  • Black felt pen
Instructions:
  1. Wash shirt to remove sizing. Do not use fabric softener in the washer or dryer.
     
  2. Cover work surface with garbage bag.
     
  3.  Using black felt pen, freehand flower pattern on scratch paper, flipping over for a reverse pattern for one flower.
     
  4.  Place shirt on work surface and smooth flat. Cover pattern with plastic wrap, taping excess to back. Insert pattern into shirt and position in place. Pattern will show through shirt.
     
  5.  Wearing gloves from kit, fill each dye bottle with water. Shake until thoroughly mixed.
     
  6.  Squeeze a small amount of Fuchsia Dye on foam plate. Wet and dry brush with paper towel. Dip brush in Dye then press into center of flower. Dye will spread on fibers. Paint dye to about ¼” from edge and let spread to line. If more dye is needed, add paint at center again and let spread. Clean brush and plate.
     
  7.  Squeeze a small amount of Yellow Dye on plate and mix with Fuchsia to create an orange color. Fill in petals of lower flower with this mixture. Clean brush and plate.
     
  8.  Add Turquoise to plate and fill in petals. Add Yellow centers to each flower then Lime stems and leaves.
     
  9.  Cover with plastic wrap or garbage bag. Let set 4-6 hours. Fill washer to large load setting with a small amount of laundry soap. Dry in dryer.

Read more at http://www.favecrafts.com/Crafting-with-Kids/Flower-Tie-Dye-Shirt-from-Tulip#FqIKr607ZpOZ5gzX.99

Tissue Paper Night Lights

Get your kids involved in this simple night light and get them to add their own creativity .
This uses very simple everyday materials.

Go to the link to follow the steps.
http://www.kiwicrate.com/projects/Tissue-Paper-Night-Lights/621#